Easily Create Windows 11 UEFI Bootable USB in Top 3 Ways
If you are still searching for an easy and secure way to create Windows 11 UEFI bootable USB, you can refer to this post with top 3 ways. You can choose Media Creation Tool, Rufus, or best free media creator as you need.
By Clytze Updated on November 4, 2022
In this page:
What is UEFI boot mode?
UEFI (Unified Extensible Firmware Interface) booting mode is a new motherboard booting project after BIOS (Basic Input Output System), breaking many of the limitations of BIOS mode, including limitations on hard drive size, boot process, number of partitions and security, and with more advanced features.

The difference between BIOS and UEFI boot mode
You may familiar with the traditional legacy boot mode, but not so much with UEFI. Don’t worry, you can have a clear understanding of them here.
⋆ The UEFI boot process initializes the UEFI at boot time, and then, boots the operating system directly into the system. Compared to traditional BIOS (legacy) boot, UEFI has one less BIOS self-test process, so booting will be faster and save boot time.
⋆ UEFI allows users to handle storage devices larger than 2TB, while older legacy BIOS cannot handle such large hard drives.
⋆ Compared to traditional BIOS, UEFI has more setup menus and a simpler graphical user interface, while bios has black and white text-only display.
⋆ When installing a computer with a traditional BIOS boot, the partition table format is MBR, and the installation is basically a BIOS boot + MBR partition format. And UEFI boot installation computer, hard disk partition table is GPT format, after the installation of the operating system it runs on the basis of UEFI boot + GPT partition format.

Having learned about UEFI boot mode, you may wonder if there is an easy way to create a Windows 11 UEFI bootable USB, now you are in the right place. Moving on, you are capable to learn 3 simple and secure ways to finish this task. Just read patiently by yourself.
How do I create Windows 11 UEFI bootable USB? (3 ways)
In this section, you can master the top 3 methods to create Windows 11 bootable USB, and boot your computer in UEFI mode. There are some preparation you need to be attention of:
- In order to boot from USB in UEFI mode successfully, the hardware on your hard disk must support UEFI. One of the most important things is to make sure that your system disk is GPT style. If not, you have to convert MBR to GPT disk first.
- And you need to go to the Microsoft website to make Windows 11 UEFI ISO download first.

- Prepare a USB flash drive with at least 8 GB or larger in size.
Now let’s check the methods one by one to see which one suits you most.
Way 1. Create bootable USB with Media Creation Tool
Microsoft has designed a specialized tool that you can use to download the Windows 11 system image (also known as an ISO) and create your bootable USB drive.
1. Go to the Microsoft website, click the Download Now button under the “Create Windows 11 installation media” section.
2. Launch this tool, select language and edition, then click Next.
3. In the Choose which media to use window, select USB flash drive, then click Next.

4. Select the USB flash drive from the list, but make sure there is no critical data on it, as this process will erase everything on it. Click Next.
5. Once you complete the steps, you will have a Windows 11 bootable USB that you can start the computer with the USB drive to install Windows 11 in UEFI boot mode.

Way 2. Create bootable USB using Rufus
Rufus is an open-source program that can create a UEFI bootable USB by using an existing ISO file. Connect your USB flash drive to the computer and then follow the steps below. The utility works similarly to the Media Creation Tool, and you can provide an existing ISO file or download the files directly from Microsoft.
1. Download, install and launch Rufus on your PC. Open it, select the USB flash drive from the Device tab.
2. Click on the Select button under the Boot selection tab, and then select the Windows 11 ISO file from its folder path.
3. Select the Standard Windows 11 installation option from the Image option drop-down menu.

4. Select the GPT option from the Partition scheme drop-down menu.
5. Select the UEFI (non-CSM) option from the Target system drop-down menu.

6. Then you can click on Show advanced drive properties section and keep the default settings.
7. Enter a name for the USB drive in the Volume label field, and then you can select a File system and cluster size from the drop-down menu.
8. After the Format Options are confirmed, click on the Start button.
9. Click on the OK button to confirm this process and click the Close button.
After you complete the steps, the tool will begin creating a USB media with the Windows 11 installation media.
Way 3. Create bootable USB via Bootable media creator – AOMEI Backupper
Besides the above two utilities, you can still use a third-party tool to make a bootable USB. Here I strongly recommend AOMEI Backupper Standard, the best free media creator to you.
With it, you can not only create Windows 11 bootable USB for the current computer but also another PC. When you has Windows 11 blue screen problem and it fails to boot, it can also be a quick solution to fix the startup problems. With this freeware, you can enjoy following advantages:
✿ It supports creating a bootable USB, CD/DVD, or simple ISO file.
✿ It can be applied to all Windows PCs, including Windows 11/10/8/7 (both 32 bit and 64 bit).
✿ It's compatible with both BIOS and UEFI modes, without the file system limitation.
✿ As a comprehensive data protection solution, it allows you to create system backup, disk backup, file backup and partition backup at scheduled internals such as daily, weekly and monthly to various locations like local disk, external hard drive or network share, cloud, etc.
Now, let’s get started to create Windows 11 UEFI bootable USB with AOMEI Backupper Standard.
Step 1. Download the freeware, install and launch it. Then click Create Bootable Media under the Tools tab.

Step 2. Select Bootable Disc Type. It’s recommended to select Windows PE. This option is suitable for everyone and offers you more operations than Linux.

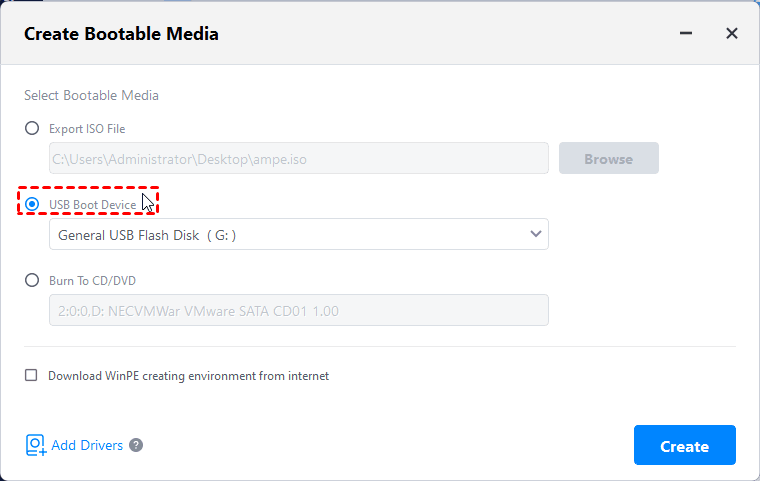
Step 3. Tick USB Boot Device and then click Next to move on. Wait for the process to complete and click Finish.
Tip: If you don't have any USB or CD/DVD, you can simply enable the AOMEI recovery environment boot option when you upgrade to AOMEI Backupper Professional. It works just like bootable media, but only available on the current computer.
Now, the UEFI bootable USB is created successfully, you can use it to boot your computer. But how to boot Windows 11 from USB in UEFI mode? The next part will tell you the answer.
How do I boot from USB in UEFI mode?
Once you have created Windows 11 UEFI bootable USB in hand, you can boot from USB in UEFI mode to start your computer. Here are the steps on how to enable it.
1. Power on your computer, and then tap the F2/F10/F12/ESC/Del or other function keys (depending on your computer manufacturer) to open the Setup Utility window.
2. Navigate to the Boot tab by pressing the right arrow key.
3. Select the UEFI/BIOS Boot Mode, and press Enter.
4. In the pop-up window, select the UEFI Boot Mode and then press Enter.

5. Save the change and exit the window. After that, you can try using the bootable USB to start your computer in UEFI mode.
Conclusion
If you have trouble creating Windows 11 UEFI bootable USB, you can refer to this comprehensive tutorial and try the given top 3 ways to securely achieve your goal. You can try either Media Creation Tool, Rufus, or the third-party tool AOMEI Backupper according to your real needs.
Sincerely, I recommend you give AOMEI Backupper a shot, for it can not only create bootable USB for you but also help you clone SSD to SSD on Windows 11 as the best migration tool. And it integrates free sync, backup, and restore features, which play a critical role in protecting your data security.

